Monday, November 22, 2010

French Onion Soup


I am right now in the beautiful city of Halifax...not quite sure what to do with myself.
I found some pictures of food left on my camera, so I decided to blog a little...why not?!
Speaking of food blogs though...after my Canadian stuffing success Americans are all about stuffing recipes. I usually ignore them (since mine is so awesome- lol!) but this was too cool...stuffing meatballs! How cool is this?!

In any case, this post is about French Onion Soup...

My mom used to make this crazy version. I remember it vaguely, so I hunted around on the interwebs and came up with this hybrid version.

What you will need:

2 large white onions - chopped
2 large cloves of garlic - sliced
1/2 stick of butter
Oregano
Thyme
Garlic Powder
3 cups Chicken Stock
1 cup white wine (and a glass for you!)
Sliced whole grain bread
Gruyere Cheese - shredded

Once all the onions are chopped, melt the butter
Add the onions
Keep the heat on medium low
Once they start sweating, add the garlic

Let it all sweat down to a big onion-y, delicious mess
Add the chicken stock
Add the spices
Let it all mix together
Add the wine
Let it all simmer together until the whole house smells like...heaven.
When ready to serve, pre-heat the oven to broil
Add a layer of gruyere
Add a piece of toasted bread
Add more gruyere
Heat in an oven-proof bowl until golden and bubbling

Tuesday, November 2, 2010

In gratitude...

Thanksgiving is a time to reflect and think about the year that has gone by...or, well, it's just a time to gorge and get a three day weekend.
I would love to say that it is more the former than the latter, but at the end of the day, it's a lot more of the latter...


One thing I can say about Thanksgiving is that I love the food that goes with this fabulous holiday!

I love cooking a whole turkey, I love making stuffing, I love all of it!
I will admit, I have lofty future goals of making fresh rolls and cranberry sauce one day, but for now, we have to stick to the basics.

Here are some shots from this Thanksgiving...

Firstly, I am going to share my family's stuffing recipe. OK, so that I don't get the call from my mom telling me that she gets no credit! (Thanks for the crouton recipe mom!).


What you'll need:
2 large white onions
4-5 stalks of celery (chopped)
4-5 carrots (chopped)
1 pound of sausage meat
1 box of stuffing mix (we have always used this kind - delicious)
1/4 stick of butter
1 egg
Salt
Pepper
Various herbs (garlic powder, oregano, thyme...the classics)


In a large pot, melt the butter.
Chop the onions (don't worry if they are not perfectly symmetric) and add them to the pot under low to medium heat.
Let them sweat out until they become translucent


Add some spices
Do not let them brown
Add the sausage meat
Let it cook with the onions
As the meat cooks down and the natiral liquid is forming, add the carrots & the celery
Let it all cook down together under low to medium heat
Once you see that the meat is cooked (don't worry if it is not perfect, you will be stuffing the turkey later and cooking it more)take it off the heat


Let it all cool down
Once it is cool, add the stuffing mix
Add spices again
Start mixing everything together
You will need it to stick together so at this point, add the egg.

Let it sit while you prepare the turkey.

Now, you can prepare a traditional turkey (full bird) and clean it, stuff it, rub it down with margarine and then stuff it.
Use a piece of bread to cap the cavity (both ends)- this is an old trick that my grandfather taught my dad and my dad taught me...
Lay strips of bacon on top and let the it cook with the bird, the fat will keep the skin moist and browned...
The secret to a great turkey my friends, is very simple, baste, baste, baste...
Every 15 minutes if you can.

This year, the butcher deboned a turkey breast, stuffed it at the shop and layed strips of pancetta on top. He then tied it all with twine to make the most beautiful non full bird turkey I have ever seen...


I really am a lucky girl!

Thursday, September 16, 2010

Ceasar Salad

Alright, so I have been MIA. But, it's cold outside, I feel like cooking and blogging! Does this mean we haven't cooked at all? Hell no!
But now, it's ON!

I love making salads, I love eating salads, and I love delicious salads. This ceasar (cesar?) salad is a guaranteed crowd pleaser!


Let's talk firstly about the croutons. They are not just a little necessary, they MAKE the salad.


What you will need:

2 tbsps of butter
1/4 cup of olive oil
4-5 garlic cloves (chopped)
Garlic powder or salt.
Half a baguette, cubed.

In a pot, melt the butter. As it starts melting, add about 2 tbsps of olive oil. Add the garlic. Once it is brown, add the bread. Put the lid on the top and shake the bread around to coat each piece. If you see that the bread is not fully coated, add the remaining olive oil and about 6 shakes of garlic powder/salt. Then, shake again. Let the bread warm over medium heat, once it is lightly toasted on the oustide it is done. You will have crunchy, garlicky croutons with a soft, tender inside!

As for the salad:

What you will need:

Romaine Salad (choose the amount based on how many people will be having the salad)
Bacon
4 tbsps Olive Oil
6 tbsps White wine vinegar
2 tbsps Dijon mustard
Salt
Pepper
Worschesterchire (seriously? How in God's name do you spell that?!)
Garlic powder

Clean and chop the salad
Cook the bacon until medium-crisp (you will, once it's cooled, chop it up)

Mix the olive oil, white wine vinegar, dijon, S&P, a couple of dashes of worsterchesterchirechester, and the garlic. (Clearly, depending on the number of people, you can adjust the dressing amount).

Place it all in a big bowl and toss!
For a little oomph! add some parmesan cheese to the final mix!

Sunday, August 1, 2010

I can't believe it's not pork...

Ok- so the sad truth is that I cannot eat as much meat as I have been eating. I just get sick from it all. So, when there is a vegetarian option I will grab it!

We go to our favorite neighborhood place called the Pick-Up and we FEAST! One of their best things is their pulled pork, in fact, that is what made me try my hand at it (scroll down to see how that turned out). They have not only a great pulled pork, but an amazing vegetarian option! On top of it, they have these amazing sweet taters...mmm, heaven.


We just got back from vacation, so I don't have much to share, but we had a killer dinner the week before we left...more on that to come!

Thursday, June 17, 2010

PIZZA!

Hi everyone!

OK, I am so excited! One of my favorite foods in the world is pizza- hands down. And, thanks to a very generous gift of a Kitchen Aid stand mixer (from T's mom) my dream to make it at home has come true!


Firstly, I must start with the dough. We made a dough before this one and it was OK, but just OK...

This one? Mamma Mia...


I adapted a little from the Gourmet Today (best book -fyi!):

What you will need:

1 1/4 ounce packet of active dry yeast
1 3/4 cups of all-purpose flour (unbleached)
3/4 cups of warm water
1 1/2 tsps salt
1 1/2 tsps olive oil (come on! use the good stuff!)

Stir the yeast and 1 tbsp of flour into 1/4 of warm water
Let it stand for about 5 minutes (it says until creamy, but water with flour in it IS creamy already, so I waited until the yeast seemed to be expanding)
If it does not look like the yeast is reacting, try again with another packet.

Stir 1 1/4 cups of flour and the salt in a bowl
Add the yeast & the oil
Stir until smooth
Add the remaining flour
Now, you can use the mixer or just knead by hand until the dough is pulling aside from the bowl...I stirred about 6-8 minutes at medium on the stand mixer
It needs to be smooth, soft and elastic-y
Form a ball, and sit it on a floured surface and dust it with more flour
Cover it first with loose saran wrap, then with a towel
Let it sit about an hour and a half until it doubles in size.

So, I did all this and then, after about 5 hours, we decided to have it the next day. So we refrigerated it for a day. The next day we took it out about 1 hour before we cooked and it rose again slightly.

The book has this 'steering wheel' method of getting the dough ready, I say nevermind to that!

I opened it up and you would any dough, with light kneading to not lose the air, and then, since I needed it to expand more (the dough can be a little tight)I LIGHTLY ran a rolling pin over it to get the size that I wanted.

I did not create a crust, I made a flat rectangular pizza.

I will tell you what I did, but from here it is carte blanche my friends- add whatever toppings you love!

I drizzled olive oil on it and added some tomato sauce we already had (more on that later). Then, I pan roasted some garlic, added some spinach (I let it steam down and reduce in the pan) and covered everything with mozzarella.


Seriously? I never thought I could make pizza this good!

YUM!!!

Monday, May 24, 2010

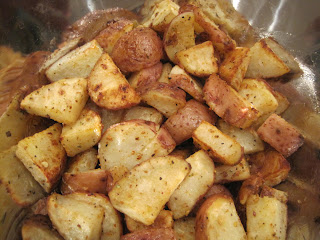
Mmmm...potatoes


I love potatoes, I don't know if it's because I am Irish or simply because they're delicious but, I don't care. I love them.
T and I were making a frittata the other day, making sure that we used up all our veggies that were on the edge, and I saw these lonely potatoes in the fridge and decided to cook them up.

What you'll need:

2 large potatoes
Garlic powder
Salt
Pepper
Olive Oil

Set the oven to 375

Boil a pot of water
Add the potatoes until al dente (right before fork tender)
Let them cool a little
Dice them up
Add salt, pepper, garlic powder and olive oil to them
Lay them out on a baking sheet
Put them in the oven for about 25 minutes or until crispy

Mmmm...

Sunday, May 16, 2010

Spring Frittata


I am multi posting today for a couple of reasons:

1- Game one of the Philly-Habs season is on and it's making me nervous, so I am distracting myself!
2- I have guilt from missing so much time from the blog

But, we've been cooking! And I have been taking pictures!
I have started a new job, and as everyone knows, that is a tough time and an exhausting one. I spend my day at a computer and when I get home, I just want to crash. But no more! Not only am I going to be smarter about my eating (summer dresses are a little tight), I am going to blog more since I really love it.

We decided the other week that we were not going to buy any food until we had emptied out the fridge as much as possible.

Insert everyone's frittata recipe here...

So, um, here's mine!


Spring Frittata

What you'll need:

4 eggs
Spinach (2 cups)
Asparagus (as much as you have!)
3 Tomatoes
Thinly sliced pancetta (you can use bacon, lardons, Canadian bacon, ham slices...anything you want!)
Grated parmesan

Preheat the oven to 350 (f)
In a large pan, preferrably with high sides, cook up the pancetta
As it starts to crisp on the side, add the asparagus
Wait a few minutes for it get bright green
Add the spinach
Once it has wilted down add the tomatoes (cubed)
Let everything simmer for about 2 minutes
Add the eggs
Salt & Pepper
There is no need to wisk everything up, just make sure all the veggies are covered
Wait until the sides are brown and come away from the sides
Top the frittata with grated parmesan
Put it in the oven and let it cook until the cheese is lightly browned

Chicken Wings


Alright, first of all, I apologize for having been gone so long!

Secondly, I need to make this post as a matter of principle.

Yesterday, T brought home some chicken wings. And, I have to tell you, I looooove chicken wings. As we were discussing how to cook them, I suggested we try a crust and do a baked "fried" chicken. That was met with what I will call "disdain". I mean, a roll of the eyes and a "pfff"...

So, I said, "OK, I will make only a couple my way and we'll cook the rest on the grill". As he hopped into the shower, I got to work. I started with some Miss Vickie's crinkle cut plain chips. I put about four handfuls in a large ziplock bag, added 1/4 cup celery salt, 1/4 barbeque spice and 2 tablespoons of dried garlic. I shut the bag and the ran a rolling pin over it.

I decided that in order to have the fried chicken effect that I wanted,I filled a small bowl with flour, another one with an egg (2), milk (1/2 cup) and 2 tablespoons of BBQ sauce. I dipped the wing in the flour, then the egg wash, and then into the chip crust.

I had preheated the oven to 425 and let the bake for 30 minutes.

Out came these crispy, juicy, crunchy tender wings...


Mmm... they were so good!

And, I am posting this today, in order to PROOVE that this idea is my own!

T said he was not going to give me my props in the shop as he told everyone about this recipe. Well, HA! this was all MINE!!

(ps- I know I am not the first to think of this in the world of cooking, but in my household, it was my stroke of genius!)

Tuesday, March 23, 2010

Spelt Pasta with peas & proscuitto


Ok...there are olives there too, but it wasn't as catchy in the title.

I am on a healhier kick these days, and T's input on this is for me to use proscuitto instead of bacon. I don't disagree with his choices, I am simply pretty certain they're not healthier options.

This meal was simple and delicious. We kept it super basic, so if you'd like to kick some heat in there I would simply add chili flakes or some hot sauce before adding the cheese.

We have been trying to eat healthier, hence the spelt pasta (or Farro in Italian shops). It was delicious and quite lighter on the stomach than regular white pasta.

What you'll need:

1 package of spelt pasta (for this recipe we only cooked half of the package and had leftovers)
1/4 pound of cubed proscuitto
1 can of sweet peas (I used an organic brand, you can obviously use fresh peas- about 1 and a half cups)
1/4 cup of black olives
1/2 cup of grated parmesan cheese

Boil salted water
Add the pasta
While it cooks place the procuitto in a pan and start frying it on medium heat
Once it's a little brown on the edges add the olives
As they cook up, drain the peas and add them to the pan
(save the juice! If you've blanched fresh peas, save the juice!)
As everything cooks up nicely in the pan, check in on the pasta
Once it's cooked to your liking, strain in and dump it back in the pot
Add the mixture from the pan
Deglaze the pan with about a half a ladle full of the pea juice
Add it to the pasta
Add almost all of the cheese (you'll want to have some for each plate)
Pepper to taste (you will not need salt given the ingredients mixed in)
Stir & Serve


See? Simple, delicious and (sort of) healthy!

Saturday, March 20, 2010

Shrimp & Rice

In a fit of stubborness, I have tried to get the butcher to go meatless for two nights for every week of Lent. Now, this may sound mean, but it's only a night, not the day. He works at a butcher shop! He can eat meat all day and then come home to salad, no? Sadly, that's easier said than done.

We have at our avail one of the best fresh produce markets in Montreal, Jean Talon market, a 2 minute walk from our place. As with all markets, you will find amazing produce that was freshly picked that day, and grown by local farmers in the region. Not only is it delicious, but it's so nice to know you're supporting local farmers while you shop!


In any case, one successful attempt was my shrimp and rice dish.
Super simple, delicious and...meatless!

What you'll need:

1 package of frozen shrimp (or you can buy them fresh in the quantity you require)
11/2 cups of rice
1 cup frozen spinach
2 tomatoes
1/2 red onion
Olive Oil
White wine vinegar
Salt
Pepper

Thaw the shrimp
Place a pot on the stove to boil the water for the rice (I am not going to tell you how to cook rice, I am sure you can do that on your own)


Coat a frying pan with olive oil
Once smoking, add the onion
When you see it's getting translucent, add the spinach
Add salt & pepper to taste (if you want a little more bite, you can add garlic, or paprika)
As the spinach wilts and shrinks, add the shrimp
Once they're pink and they have a bit of "bounce" to the touch, they're ready
Turn off the heat and add in the diced tomatoes
Spoon onto the rice, or, like we do- put the rice in a large bowl and toss in the shrimps so that all the sauce from the pan gets in there and coats the rice...


Delcious!

Tuesday, March 2, 2010

Pulled Pork Sandwiches


Alright, so we've been cooking up a storm! But, between getting a new job (yay!) that means I get up way earlier (boo) and travel farther (boo) I have been WIPED when I get home. And, my blogging has suffered! But, have no fear my friends, I have been snapping pics at every meal and have lots to share.

This recipe is by far my favorite thing I have made in a long time...it is de.li.ci.OUS. T and I have been going to this little hole in the wall called Depanneur Le Pick-Up about two blocks from our place. And they have the most amazing cheeseburgers, pulled pork sandwiches, breakfasts, you name it- it's yummy!

We have been having a bit of an obsessive time with the pulled pork though, so we finally decided that between his immediate contact with killer cuts of meat and my ability to google any recipe I want, we should make our own. So, last Saturday night we started preparing the feast that we shared on Sunday afternoon.

You guys, I am not kidding, this recipe is incredible. I have adapted from this recipe, provided by Dave Liebeman originally.

Pulled Pork Sandwiches


Rub:
2 tablespoons salt
About 40 grinds black pepper
4 tablespoons chili powder
4 tablespoons garlic powder
4 tablespoons paprika

We used two Nomu rubs the peri peri and cajun ones.

But, you can really improvise here, go with stuff that you like. If you like less spice, add dried rosemary, oregano, any dried spices really...but I say go for heat, it dissipates with all the cooking.


Meat:
18 ounces (one and a half bottles) of good beer - we used St Ambroise (and drank the remaining half)
4 cloves garlic, chopped
1 5-pound pork butt

Now, you can make your own BBQ suace, there are tons of great recipes. What I did what simmer down the juices left from the braising, I added 3/4 a cup of brown sugar and about a cup of this BBQ sauce (Chicken & Rib). I know, I know, the whole thing isn't from scratch, but this sauce is goooooood and can be used later!

Directions:
Combine rub ingredients in a bowl and mix well. Rub all over pork butt. Wrap in plastic wrap and refrigerate for at least one hour and as long as overnight. We went for overnight and man, was it worth it!

Preheat oven to 500 degrees F. Unwrap pork and place in a roasting pan with sides about 2 inches high. Cook 45 minutes until dark browned and even blackening in places. Remove from oven. Lower oven to 325 degrees F. Pour beer over the top and add chopped garlic around the pork. Cover tightly with heavy duty aluminum foil or twice with regular foil. Poke about 10 holes all over the top of the foil. Cook pork butt 2 1/2 hours longer until so tender that it comes away very easily from center bone.

This is the meat after the 45 minutes:


And, after the 21/2 hours:


Place the meat on a plate and pour the pan juice (there will be plenty) into a saucepan. From there, you can make your own BBQ sauce concoction, or do as I did:

Add 3/4 cup of brown sugar
Add 1 cup of this BBQ sauce

Let it simmer until it thinkens...about 15 minutes.

While the sauce is boiling down, pull apart the pork with 2 forks. Pour the sauce over the pulled pork and work through until fully absorbed. Do everything you can to let it set a little...but, I am telling you now, that won't be easy!


Now, once the meat is setting, prepare the rest. We took large Portugese buns and cut them in half, from there I made this simple mayo/bbq sauce (2 tbsps mayo, 2 tbsp BBQ sauce and 1 tsp of Chipotle). I sliced pickles. And we added some fresh, pre-made coleslaw.

We heated up the meat a little in a pan (no oil) before making the sandwich. So worth it, since from there I "deglazed" the pan with the pickle juice and drizzled it on the meat once it was on the bun. Top it with coleslaw, pickles, and DEVOUR.

Saturday, February 6, 2010

Chicken Sausage Salad


When I am too tired to even think straight, my default food is salad. One can only imagine how well this concept went over with the butcher!
But, little did he know that I use the salad as a catch-all, kind of a "meal in a bowl".
In any case, last night was one of those nights. I recently quit my job and am in the process of finishing up my last two weeks. So, work is even more hectic, since I have to finish everything and train someone in what I do. That said, I really did not feel like cooking last night. But, we were hungry.

So, enter the chicken sausage salad!


We have tons of sausage in the freezer (there's a joke there, but I am ignoring it!). And I wanted to make something with the portebellos since I didn't want them to go bad, I made portebellos with goat cheese - now with pictures! (I only made four this time since it was jsut T and I- the other two went into the salad).

So, without further ado, here's what you'll need for the salad:

1 red bell pepper - diced
1 green pepper - diced
1/2 sweet onion - diced
2 garlic cloves
2 potebello mushrooms - sliced
4-6 small chicken sausages
Olive oil
Balsamic vinegar
Salt & Pepper

In a pan with olive oil, add the onions and the garlic. Let them brown.
Once they've browned lightly, add the mushrooms.
As they shrink down, add the sausages.
Do not peirce them (the butcher taught me this) as it will let the juices drain.
Instead, turn them regularly, until they're done- about 10-12 minutes.
Once they're ready, remove them from the pan and let them sit.
While they cool, add the onions, the garlic and the mushrooms to your salad bowl.
Drizzle olive oil on them.
Add about 1/4 cup of balsamic vinegar.
Cut the sausages into about 3/4 inch peices
Add to the salad bowl
Add the peppers
S&P

Toss & Serve.

Ta da! Dinner in about 20 minutes...LOVE IT!
The best part? The butcher was so happy, he ate it all up!

Tuesday, January 26, 2010

Food Snobbery

I have been trying to find my bearings in this crazy foodie world, and I have to tell you- it's scary!
There are all of these rules, and everyone seems welcoming but I fear that a snobbery lurks close beneath the surface.
I wanted to share stories, recipes, and have fun with other people who love food!
I don't want my pictures to be rejected because they don't look like they came out of a photo shoot for Bon Appetit! I took them in my kitchen! And I had a hungry butcher standing next to me asking me if it's time to eat yet! I can't make an extra one to photograph!
Alright, I am just ranting now, but I find this foodie, blogging world a little intimidating.
I know I am a great cook, and that I have something valuable to share, hopefully I will find the best way to do it!
OK, I feel better now.
*breathing*

Monday, January 25, 2010

Chocolate Chip Goodness


I have been baking for as long as I can remember. My nana was a great baker, and we'd always concoct something together. I loved the feeling of making a treat, not just a meal, but a real surprise for everyone... That feeling is still strong today.

I went up north a couple of weeks ago, and decided that chocolate chip cookies were very necessary for this weekend. I have been perfecting this recipe for years, I think I finally have it down!

What you'll need:

Firstly, heat the oven to 375 degrees.

3/4 cup butter (melted)
1 cup packed light brown sugar
1/2 cup granulated sugar
2 eggs
1 teaspoon (or a capful) of vanilla extract
2 1/4 cups all-purpose flour
1 teaspoon baking soda
1 1/2 teaspoon baking powder
1 teaspoon salt
1 package milk chocolate chips

Blend the butter and the sugars until everything runs smoothly
Beat in the eggs and vanilla slowly (make sure the butter isn't too hot)
Blend all the dry ingredients together
Add it (while stirring)to the wet mix
Add the chocolate chips
Mix it all up

Use your hands to make balls a little smaller than a ping pong ball
Place them on a cookie sheet
Once the sheet is full, put it in the oven and cook for about 8-10 mins
Don't cook them until the top is golden brown, remove them from the oven when you see a little gold on the edges of the cookie.


The baking powder makes them rise a little more, which helps keep them moist.
Another trick is, before they get completely cool, place them in a tupperware container and shut it.
My routine is:
Remove from oven
Place cookies on a plate
Put more dough on the cookie sheet
Insert it in oven
Place cooling cookies in tupperware
Shut closed

This keeps them fresh and chewy way longer.

Tuesday, January 5, 2010

I am a lucky girl...the butcher loves sushi!

So, this New Year's, instead of the big party, the noise, the hats...we went to our favorite sushi restaurant and had our favorite sushis!

Felice Anno Nuovo!


Beautiful Dumplings, stuffed with vegetables
Incredible red rice sushi with lobster, in a delicious avocado and broccoli sauce
This is the sentimental JMDTT (je m'ennui de toi toujours- I miss you always)- a rich combo of tuna, avocado, tempura in a spicy cajun-inspired sauce
A delicate dessert (A Geisha's delight), made of fresh melon dipped in melted chocolate, left to harden on the ice. An exercise in patience is needed to wait to eat them!
Posted by Picasa
Related Posts with Thumbnails